In parallel with applying coats of RPC lacquer on the Brian May Red Special guitar body at the rate of one every six or seven days, I completed preparations for fretting and inserted the frets. To recap: when applying coats of gloss black Plasti-Kote aerosol paint and initial coats of RPC on the fretboard, I inserted 0.6 mm thick PTFE sheet into the fret slots (which were CNC-routed as radiused arc cuts) to avoid having to remove this later on and risk damaging the finish. However, I had to apply some additional coats of RPC on the back of the neck to remediate some sand-through and lacquer stripping; I did not insert the fret slot masks during this process and some lacquer went into the edges of the fret slots necessitating a degree of clean out.


To try to improve the quality of the result, I invested in another batch of fretwork tools from StewMac in the USA. These consisted of a fret slot cleaning tool, fret barber, slot depth gauge, fret rocker, 16″ long fretboard leveller and a fret end dressing file. I already had fret cutting pliers, a fret bender, fret tang nippers, a concave fret end file for medium frets, a fret arbor press and two precision straightedges from orders placed in 2014 to complete the 3/4 scale Red Special replica.


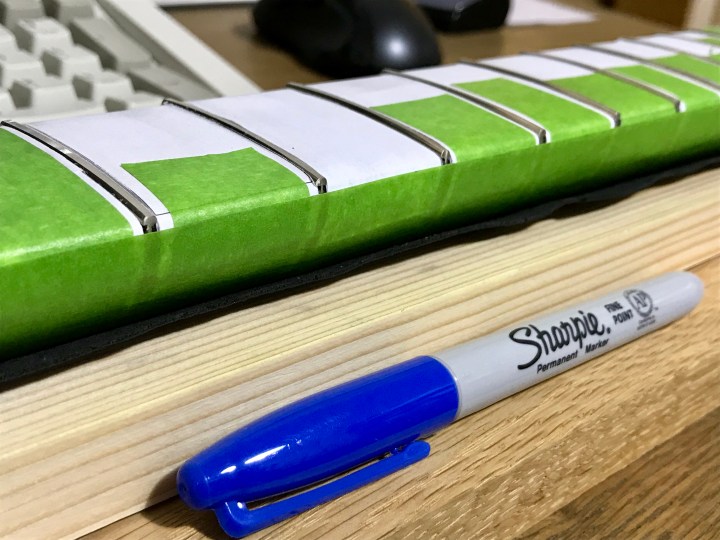
It is almost inevitable when working against dry and thus embrittled paint and lacquer that chip outs will occur and I suffered my fair share in these circumstances, although thankfully all but two small areas were completely obscured by the frets. I also scratched and dented the fretboard surface due to some tool slips but I had accepted that remedial work, e.g. lacquer repair on the sides and top surface would be required.
After discussions with other Brian May Red Special replica guitar builders, reassessment of recent pictures of the original guitar and authorised replicas and considering what options were available to Brian in 1963, I settled on Hosco Medium (M1) fretwire which is marketed as “for Gibson guitars”. This has 1.4 mm crown height and 2.4 mm crown width which will allow it to be dressed level down to a uniform height of around 1.2 mm (3/64″) on frets 1 to 24 and left undressed at the zero fret.
I prepared the fretwire by filing down the tang barbs almost flat using the StewMac tang barber and radiused it to 7 1/4″ using the fret bender. I decided to remove the tang barbs to minimise the chance of further chip outs of the finish during fret insertion or removal – now if I encountered difficulties, or in the future if a re-fret is ever needed. I have used the Khaya neck which was damaged during my first CNC cutting attempt for testing processes so I used it again to pre-cut the frets to desired width prior to insertion.

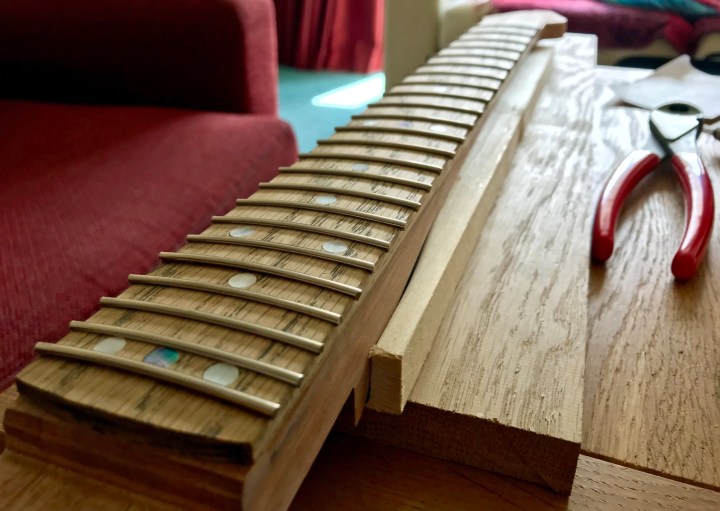

To insert the frets, I ran regular clear cyanoacrylate super glue into the cleaned and degreased fret slots using StewMac whip tips, placed the pre-cut fretwire into the slot and pressed it fully home using the StewMac arbor press. I took advantage of previous CAD and CNC endeavours to design and CNC cut a custom caul from planed softwood to allow the neck to sit with the fretboard horizontally level for fretting and other work. I was unable to easily place the heel end of the neck under the arbor press assembly because of the fixing bolt so I inserted frets 20 to 24 by hammering them in using a wooden radius block and rubber mallet to spread the applied force.
Although not strictly necessary at this stage, the frets are all level to a good degree of accuracy which should prove advantageous in the next stages of dressing and levelling down to 1.2 mm crown height, re-crowning, shaping the ends and polishing. The attached photographs illustrate some of the processes still as a work-in-progress. I took my time to complete the fretwork and subsequent remedial finishing to try to achieve the best cosmetic and technical result I can.


Next article:
Part 55: Body Assembly
Previous article:
Part 53: Finishing Progress
